How to Add Custom Tabs in WordPress Using ElementsKit (Beginner’s Guide)

Adding custom tabs to showcase multiple posts on a single page is not a new strategy to boost business opportunities. Nowadays, almost every website owner adds custom tabs to their sites.
Nevertheless, they do look different from one another. Some look more attractive and some look less. It happens due to the lack of customization options in the tool they used to build custom tabs in WordPress.
That’s why we have used the best tool, and that is ElementsKit, to show how to create tabs in WordPress that won’t take more than a few minutes!
Why is it important to add custom post tabs?
A custom post tab allows you to display multiple posts on a single page so that your visitors can view all the posts without visiting other pages of your site. Therefore, it saves lots of time as visitors can get the content they are looking for in the shortest time possible.
Besides, adding tabbed content is also space-friendly as it organizes different posts in a single place. This custom post tab is beneficial both for you and your visitor as you can utilize website space more efficiently and your visitors can experience the best UX while staying on your site.
As a consequence, they will spend more time on your site and view all your tabbed posts and blogs where you have promoted your products or services. Furthermore, because of the tabbed posts, the conversion rate of your site will also increase.
That’s why you should add custom post tabs on your site for better website performance.

How to add custom tabs in WordPress
The easiest and most flexible way to add customized tabbed posts is using a WordPress tab plugin. There are lots of WordPress post tab plugins that allow you to easily create and customize tabs. ElementsKit is one of the best tab plugins by that you can add custom tabs in WordPress within a few minutes. Besides, you can customize your tabbed content the way you want.
Now, let’s go through the 4 easy steps to add and customize post tabs within a few moments:
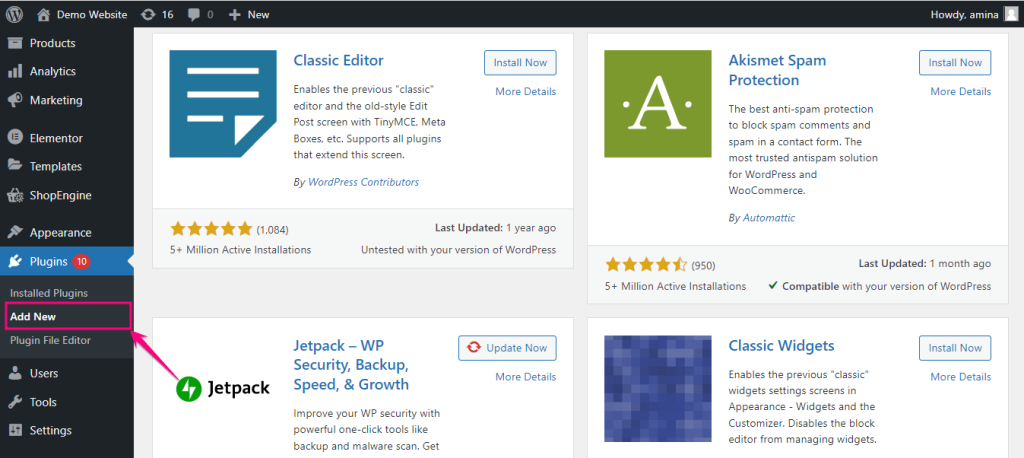
Step 1: Install and activate the Elementor custom tab plugin
You will require both Elementor and ElementsKit to add custom WordPress tabs. If you already have Elementor installed on your WordPress site, then you need to install and activate ElementsKit to utilize its Post Tab widget.
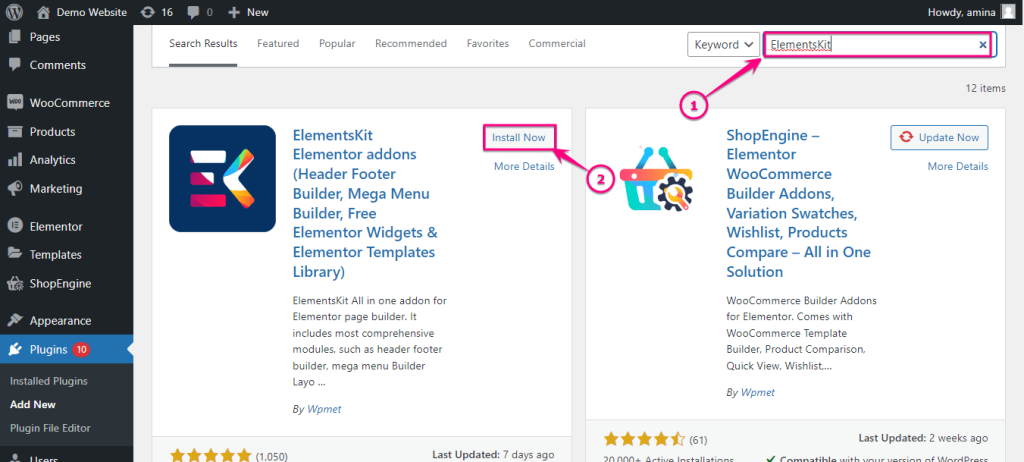
Then, visit Plugins >> Add New to install the WordPress custom tab plugin.
After that, search for ElementsKit and click the “Install Now” button to add it to your site. Also, activate ElementsKit by clicking the activate button.
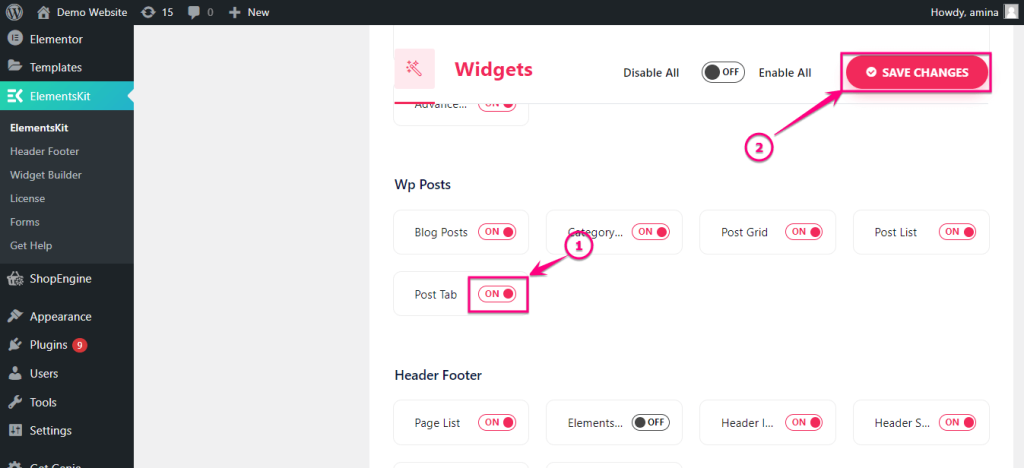
Step 2: Enable the post tab widget
Now time to enable the Post Tab widget of ElementsKit. Go to ElementsKit >> ElementsKit and click the “WIDGETS” tab like the added image.
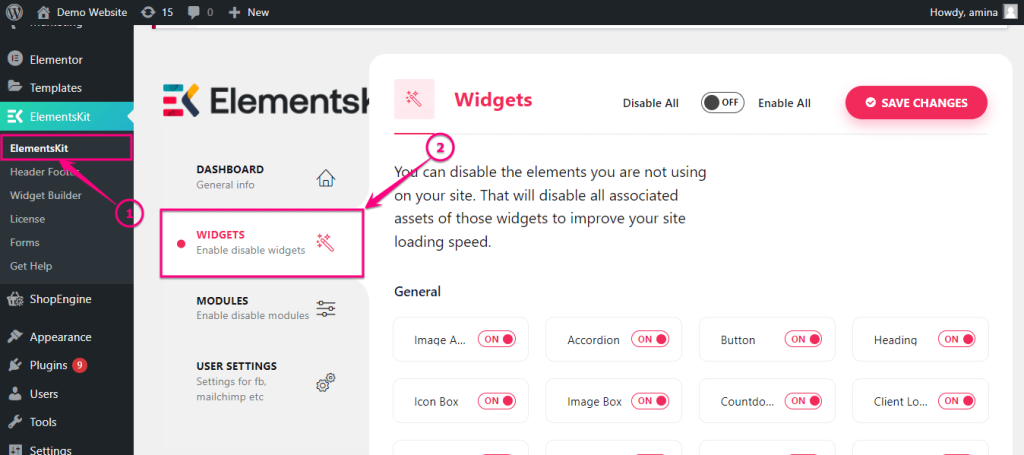
Here you have to enable the Post Tab widget and press the “SAVE CHANGES” button.
Step 3: Add a custom tab on your site
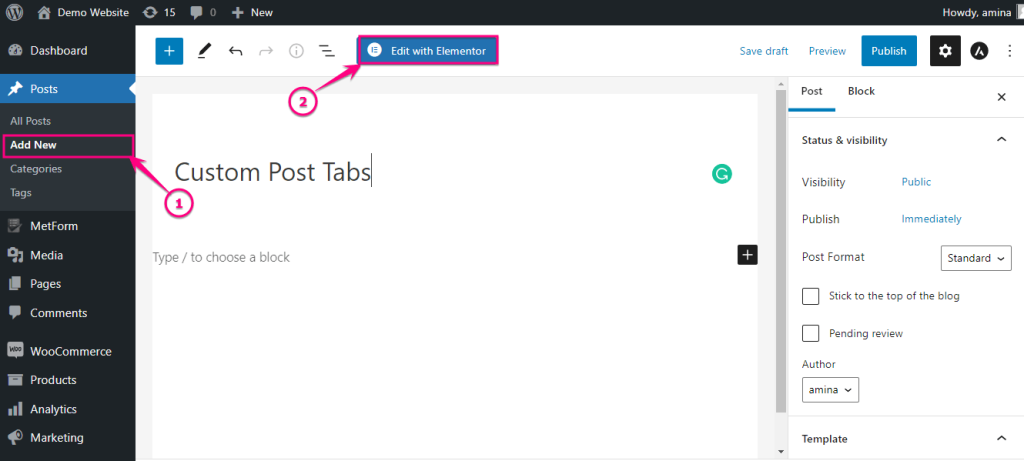
In the third step, add a new post by clicking the “ADD NEW” option under the Posts tab. Then add a suitable title to your post and click the “Edit with Elementor” button.
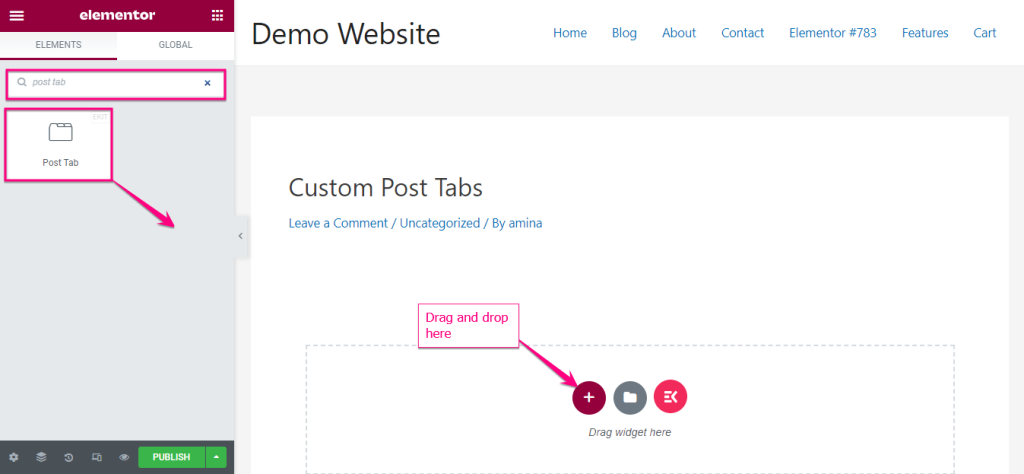
After that, search for the Post Tab, and after finding it, drag and drop it to the plus icon.
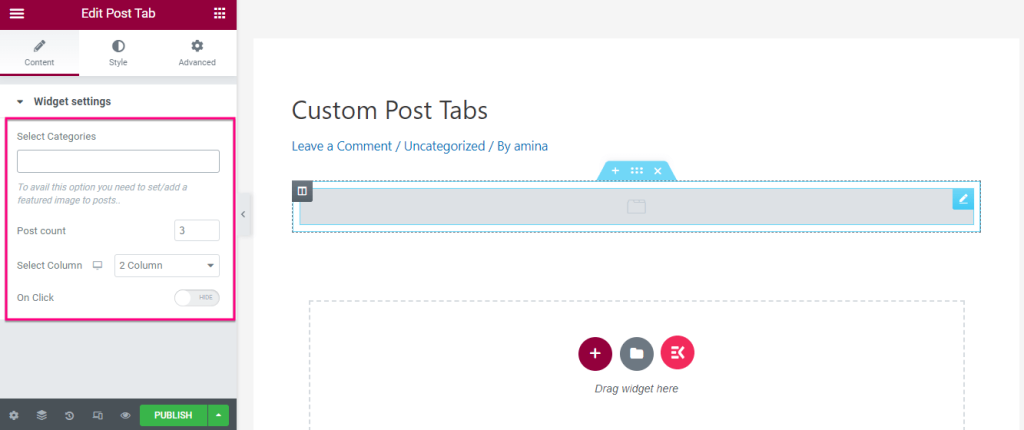
Now you have to make adjustments to the following areas:
- Select Categories: Choose your post category from here.
- Post Count: Select the number of posts you want to show in the post tab.
- Select Column: Insert the number of columns you want to show to display your added posts.
- On Click: Enable the “On Click” option to switch between categories by clicking on those.
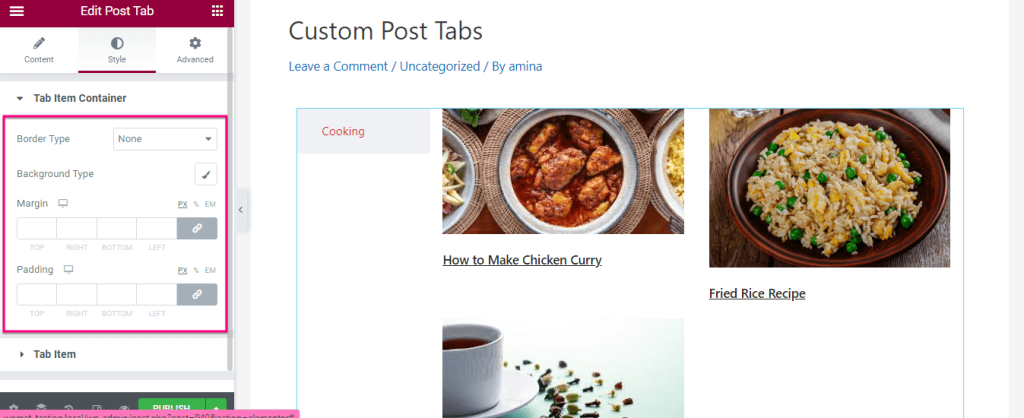
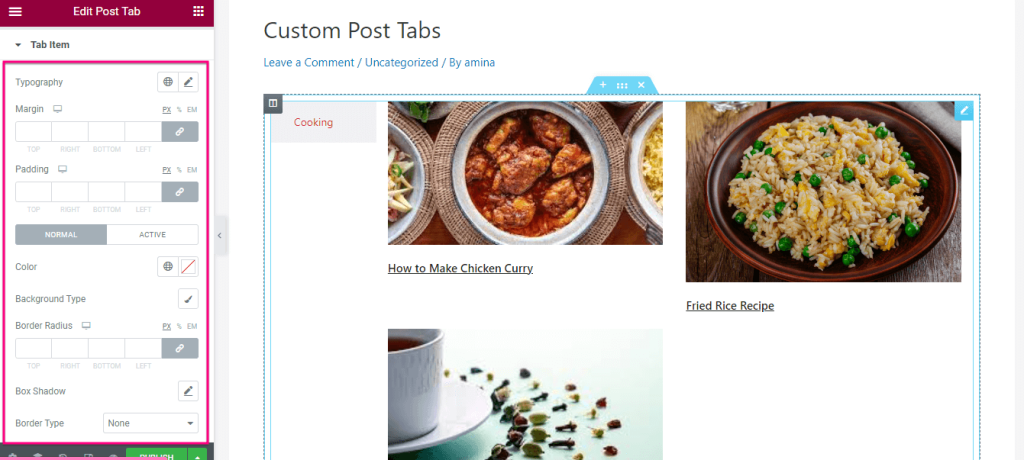
Step 4: Customize the custom tab using ElementsKit
It is time to perform the last step, customizing your post tab. Now go to the Tab Item Container and make changes to the following areas:
- Border Type
- Background Type
- Margin
- Padding
After that, visit the “Tab Item” tab and customize your tab content by editing:
- Typography.
- Margin.
- Padding.
- Color.
- Background Type.
- Border Radius.
- Box Shadow.
- Border Type.
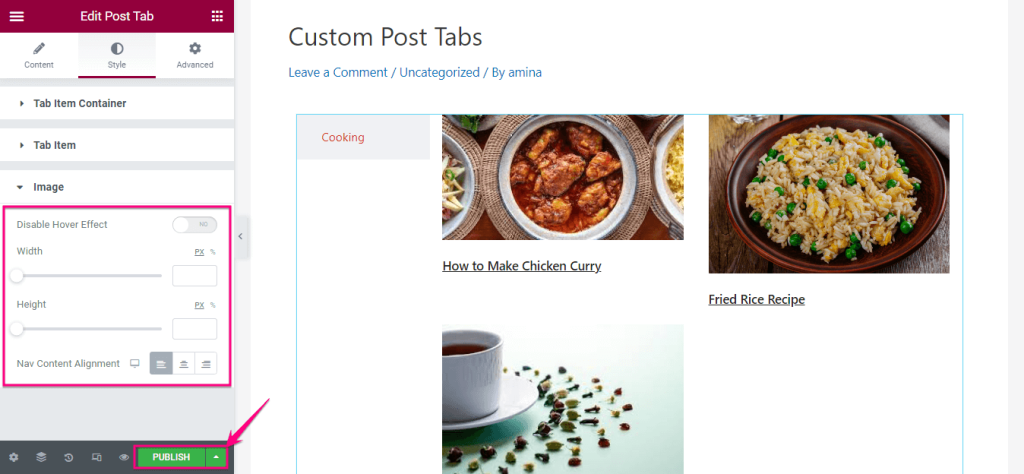
Now, go to the Image tab and adjust the width, height, and alignment of your images in the tab. Also, you need to enable the hover effect, if you want your images to zoom out while hovering your mouse on it.
Finally, click the publish button to make your customized WordPress post tab live.
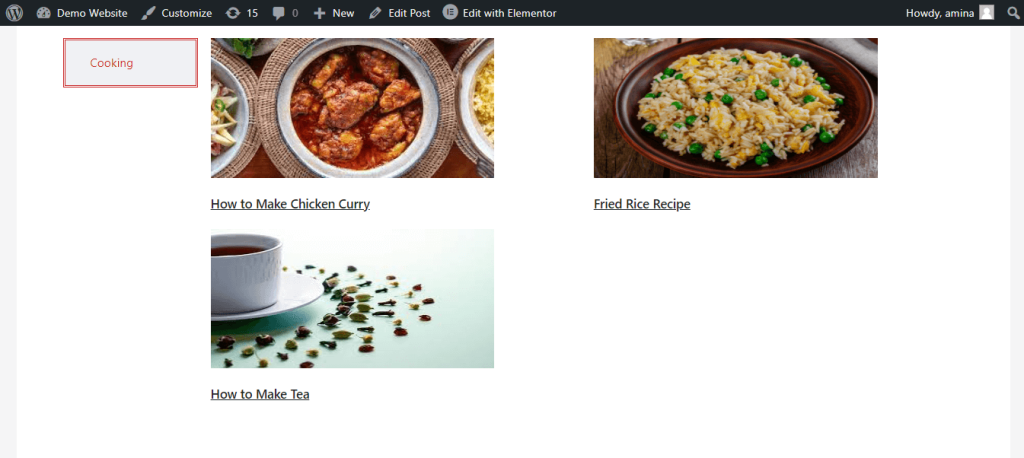
Here is the final look after publishing your custom post tab:
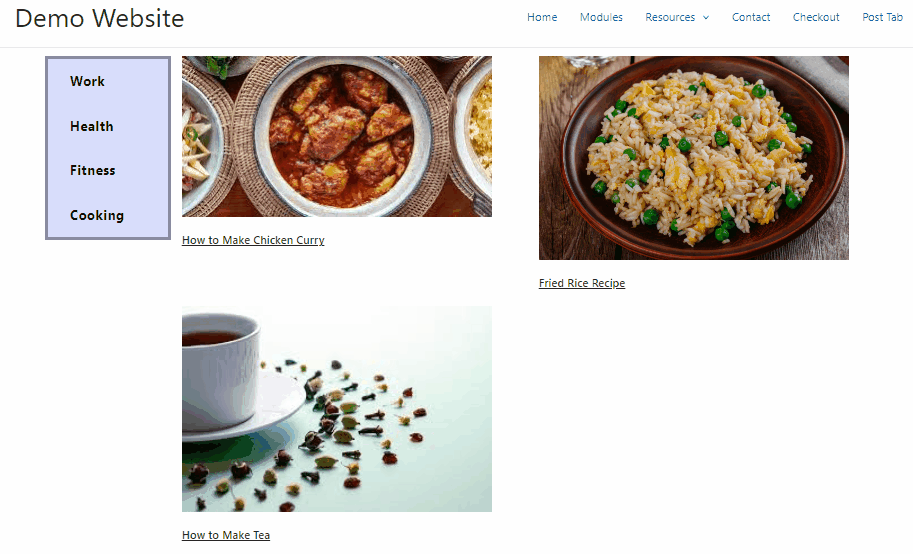
Examples of some custom post tabs built with ElementsKit
By using ElementsKit, you can build completely customized post tabs for your site. For example, you can edit color, font, typography, etc to make it more appealing. Here are some examples of WordPress custom post tabs built with ElementsKit:
More tutorial blogs:
1. Move WordPress to a new host.
2. Start a business with zero revenue.
3. Remove the page title in WordPress.
Get started with custom post tabs in WordPress
Hope you have found the guide easy on how to add custom tabs in WordPress. You might find it hard if Hope you have found this guide on how to add custom tabs in WordPress easy enough to do yourself. Whether you are an absolute beginner in WordPress or an experienced user, you can easily add custom tabs to your site with a few simple clicks and tweaks. So, go through the above guide and give it a try to unlock new business possibilities.
