How to Create an Ecommerce Website in WordPress

Websites are today’s storefronts, letting businesses sell products while customers shop from their phones. Not having an eCommerce store limits your reach to a traditional audience only.
When we think about having a website, we think of hiring web developers, complex coding, hefty costs, etc. However, WordPress has made these irrelevant as it brings pre-made elements that can create a website within just minutes. Adding eCommerce touch to that website has also become child’s play, thanks to tools like EasyCommerce.
Want to know how? Keep reading to find out.
Ecommerce Website in WordPress

WordPress is one of the most popular website-building platforms in the world. It powers more than 43.5% of all websites on the internet today. Starting as a blogging platform, WordPress quickly gained popularity in the 2010s as the go-to solution for eCommerce stores. Factors leading to its such mass acceptance:
- Cost Effective– The core WordPress platform is free to use and can be run on affordable hosting plans. Additionally, most associated tools for marketing, automation, and more offer free versions, with premium upgrades available at reasonable prices.
- Flexible– WordPress lets you customize your website however you like using countless plugins and themes. Not to mention the opportunity to design the interface and functionality using versatile builders.
- Easy to Use– WordPress has been developed to be beginner-friendly. Users with little to no prior technical understanding can get started with a little research. The internet is flooded with information associated with WordPress CMS.
- Scalability– WordPress grows with your business, regardless of the number of products you want your business to take on.
The best thing about using WordPress is that it has plugins that pack all your eCommerce needs in one plugin. EasyCommerce is one such solution that we try using to create a WordPress eCommerce website.
EasyCommerce- Best WordPress Ecommerce Plugin

EasyCommerce is a free WordPress eCommerce plugin that has been designed to overcome issues found in existing platforms. Core functionalities that make EasyCommerce stand out:
1. Fast- Most WordPress eCommerce solutions become slow as the product catalog grows. On the other hand, EasyCommerce remains as fast as day one, thanks to its use of the API-first approach.
2. Better Looking– EasyCommerce offers a great-looking design, both in the backend (business owner) and the frontend (website visitor). Yes, the days of the classic WordPress dashboard are finally over with EasyCommerce.
3. All-in-One Features- EasyCommerce provides all the key tools you need for eCommerce, like managing products, orders, and customers. It also lets you set up taxes, shipping options, and coupon campaigns.
Plus, there are free add-ons for popular payment gateways, CRM systems, and marketing tools to increase sales while making things easier to operate.
4. Highly Scalable- WordPress-based eCommerce solutions have a bad reputation for a lack of scalability. EasyCommerce, however, has been able to alter this course by ensuring your business can grow unrestrictedly.
Create an Ecommerce Website with WordPress: An Overview
Building an eCommerce website with WordPress involves several key steps that serve as the foundation of the process. While the details within may vary depending on the platform or tools you choose, the general steps remain fairly the same, such as:
- Purchase a domain name and a hosting service.
- Install WordPress on your hosting account.
- Choose an eCommerce solution like EasyCommerce.
- Set up your online store with products, payments, shipping, and taxes.
Ecommerce websites are no different than ordinary websites as they require a domain name and hosting service to become functional.
#Domain- A domain name is your website’s address on the internet. For example, if your store is called ‘Best Bakes’, your domain could be ‘bestbakes.com’. Choose a domain name that is simple, memorable, and relevant to your business.
There are many domain extensions to choose from, such as .com(most popular), .org, .info, .io, and more.
#Hosting- This is where your website lives on the internet. Look for a hosting service that offers eCommerce-friendly features like stable connection, fast speed, SSL, and good customer support.
Some popular WordPress hosting providers include:
- Bluehost: Starts from $2.95/month
- Hostinger: Starts from $2.99/month
- GoDaddy: Managed WordPress hosting at $7.99/month
Installing WordPress
Once you have your domain and hosting, you are ready to install WordPress. Installing WordPress is a straightforward process. Most hosting providers offer a ‘one-click’ WordPress installation option. The process-
- Log in to your hosting account.
- Look for the WordPress installer under the dashboard.
- Click ‘Install Now’ and follow the on-screen instructions.
Once the installation is complete, you will have access to the WordPress dashboard, where you can start customizing your site.
On a side note, your website currently has a default theme. We recommend switching to the Astra theme for a better experience.

Now that you have successfully created your website, it is time to inject the eCommerce ingredients into it. By that, we meant common functionalities of an eCommerce website, like-
- Shop Page: Displays all store products.
- Product Page: Shows details of a specific product.
- Checkout Page: The final step is to review and pay.
- Payment Option: Ways to pay, like cards or PayPal.
- Product Management: Add, edit, and organize products.
- Shipping Options: Delivery methods for customers.
- Order Management: Track and process orders.
EasyCommerce provides all the features you need to build a fully functional eCommerce website. You might wonder, ‘Aren’t these features available in other eCommerce plugins too?’ We say, yes! However, EasyCommerce takes functionality and performance to the next level. Use it today and experience the difference firsthand.
Create a WordPress Ecommerce Website Using EasyCommerce
We are done with our side talks, and now it’s time for the real deal – configuring EasyCommerce. Below is the step-by-step process of transforming your ordinary WordPress website into an eCommerce site-
Step 1: Installing and Activating EasyCommerce
EasyCommerce is available in the WordPress.org plugin repository. We will install it directly from the Plugins section in the WordPress dashboard for quick and easy setup. For that-
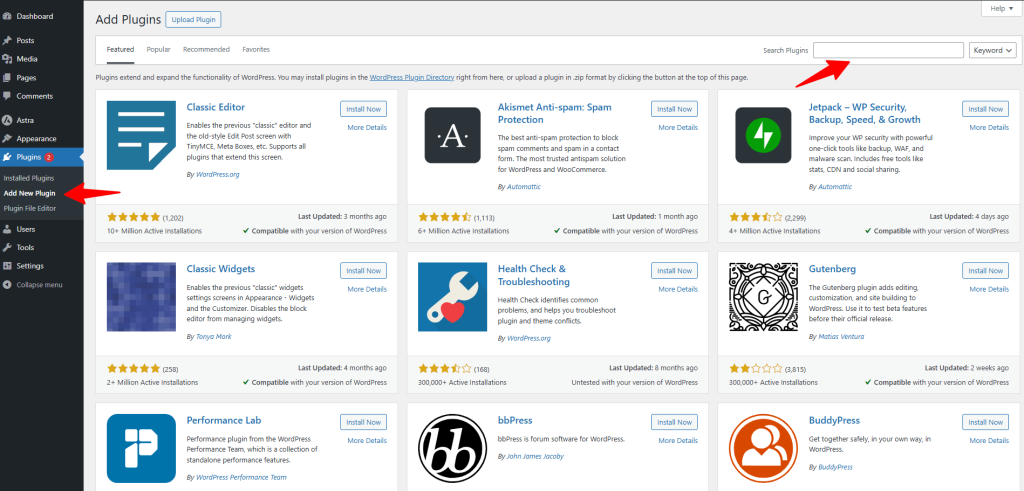
- Go to the ‘Plugins’ section in your WordPress dashboard.
- Click ‘Add New’ and search for ‘EasyCommerce.’
- Install and activate the plugin.
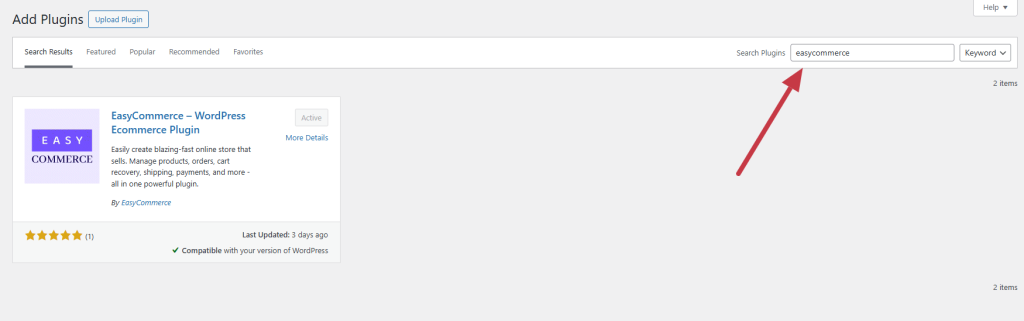
Once activated, EasyCommerce and Store will appear in your WordPress dashboard menu.
Step 2: Configure the Setup Wizard
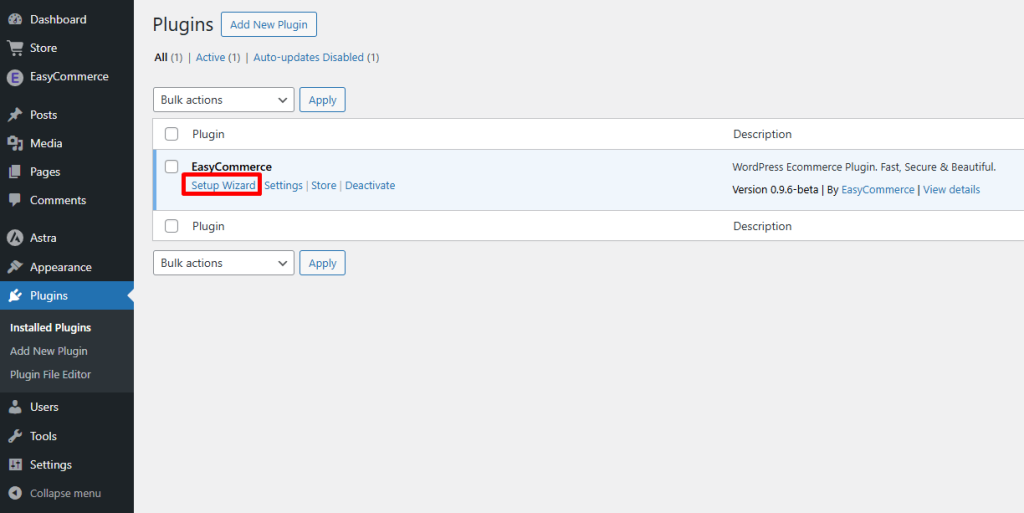
Your next move with EasyCommerce should be to configure the setup wizard. EasyCommerce includes a setup wizard that guides you through the initial configuration. This wizard helps you set up:
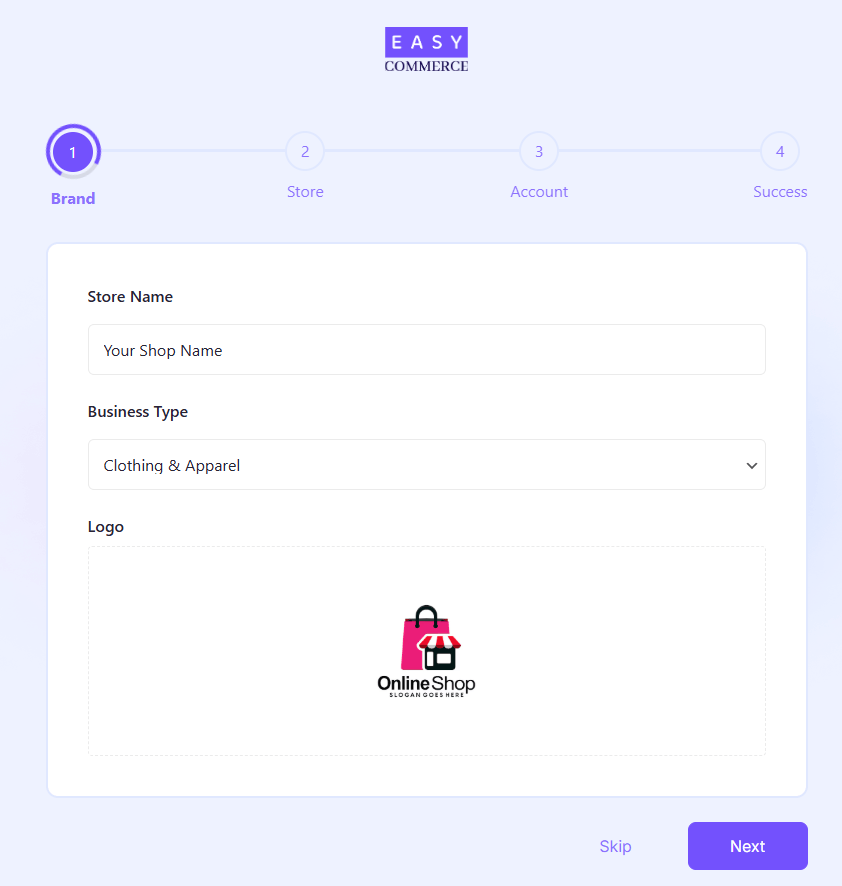
- Store Name: Give your eCommerce store a name.
- Business Type: Declare your product/service type.
- Logo Upload. Import your business logo to the website.
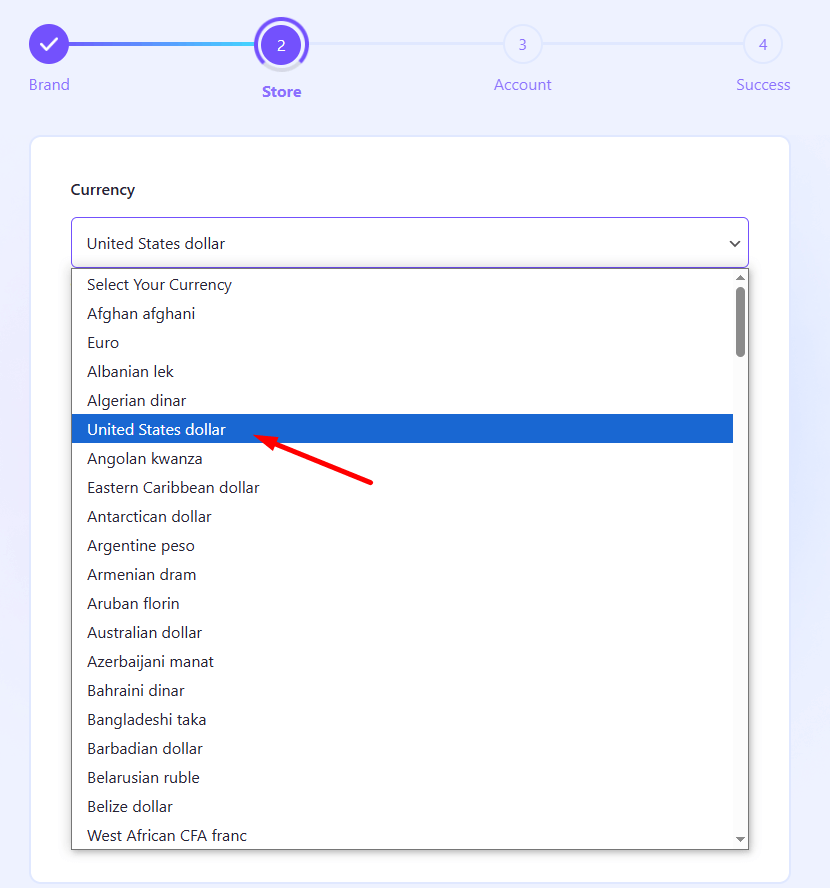
- Currency: Set your preferred currency for transactions. (Product pricing will be shown in that currency)
- Payment Methods: Choose payment methods that suit your business. You’ll get a whole bunch of such payment methods/ gateways, such as CoD, PayPal, Stripe, Square, etc. addons from the EasyCommerce > Addons section within the WordPress dashboard.
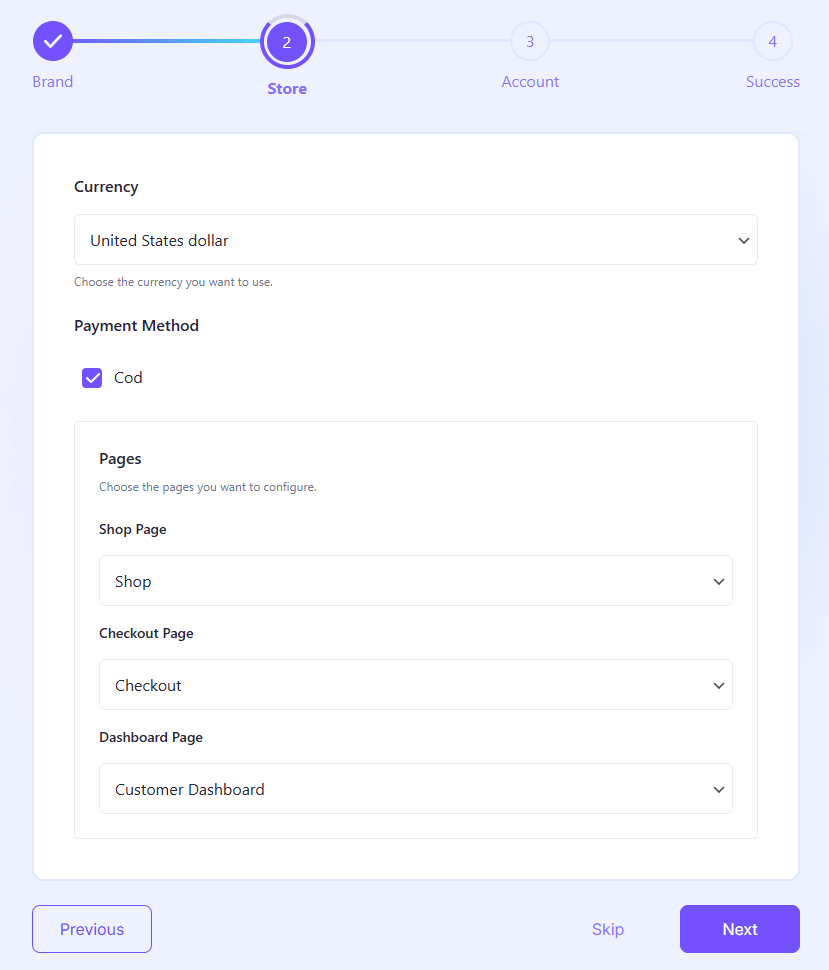
- Pages: Assign a specific page for specific operations (checkout, dashboard, shop). You can create new pages or assign existing ones using shortcodes.
Account
- Name: Provide your full name for a personalized store management and support experience.
- Email Address: Enter your email address to receive your API key to connect your store to the EasyCommerce system and get other important updates.
Now, click Next once and receive the API key through your email inbox.
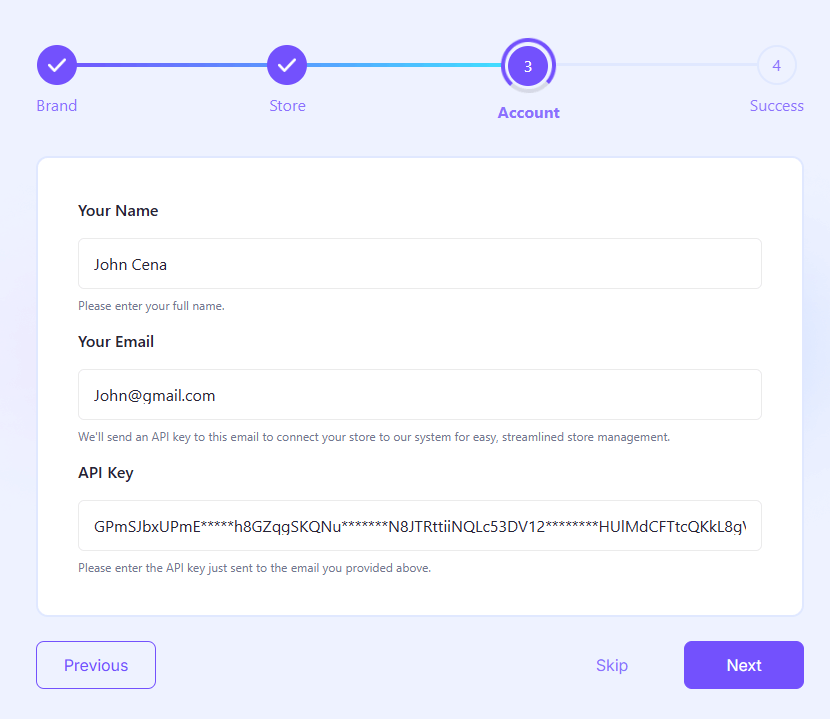
- API Key: Copy the API from your email inbox and paste it into the setup wizard’s input field.
Click ‘Next‘ to finalize the store setup. A ‘Congratulations‘ pop-up will confirm that your eCommerce store is ready to use. Click on the ‘Go to Store’ button to start adding products to the store.
How to Add Products to a WordPress Ecommerce Website?
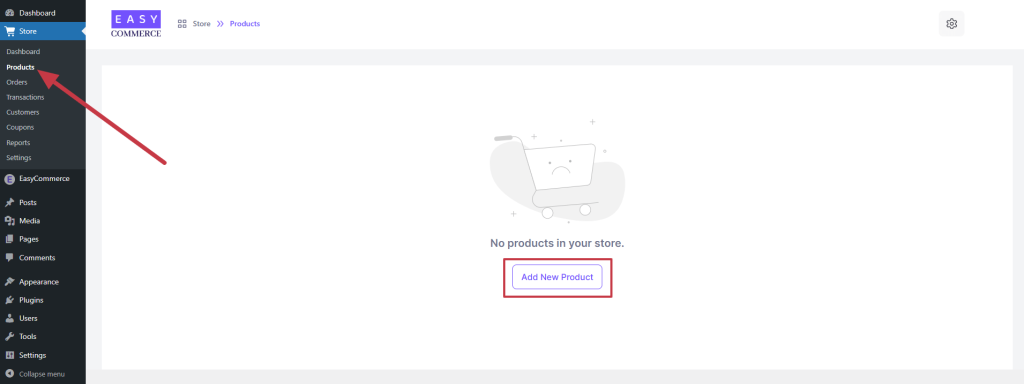
As you have completed setting up the store, the next task is to add a product to start the shop page. To add a product, go to the Store > Products, click on the ‘Add New Product’, and follow the 4 steps below-
Step 1: Basic Information
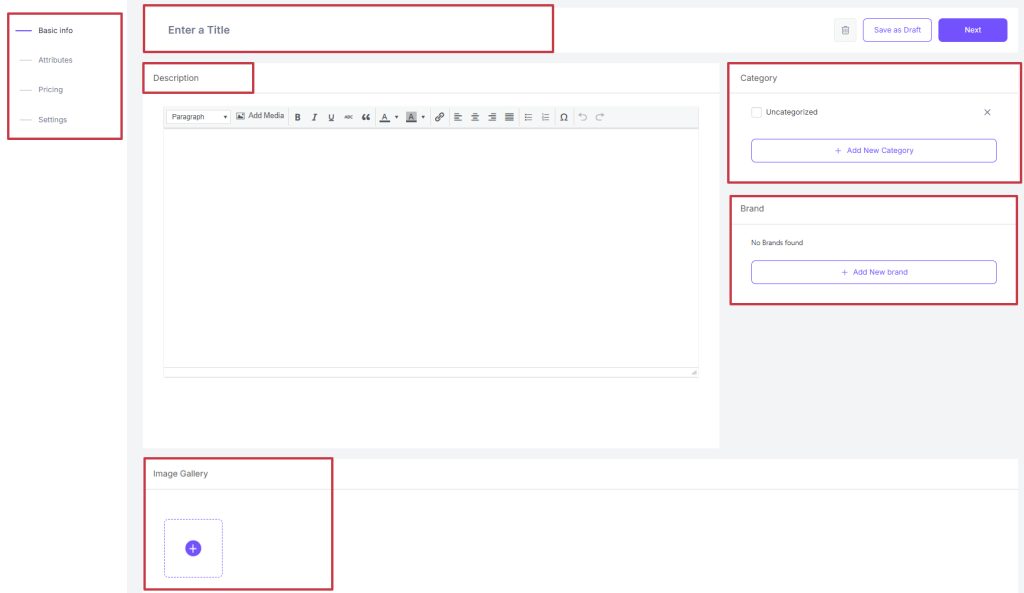
- Product Title: A clear and catchy product name that highlights the product’s main feature.
- Product Description: A compelling summary that explains the product’s features, benefits, and usage instructions.
- Image Gallery: High-quality images that showcase the product from different angles.
- Category: Assign the product to a relevant category to make it easy to find.
- Brand: Select or add the brand associated with the product to build trust.
Step 2: Attributes
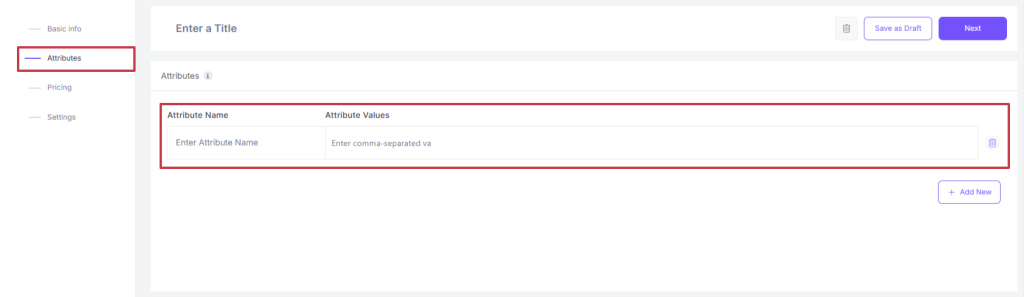
- Attribute Name & Values: Define product-specific attributes (e.g., size, colors, materials, etc.)
- Click the ‘Add New’ button every time you want to add new attributes.
Step 3: Price

Click + Add New Price and then the plus (+) button to drop down a new pricing section and add the following information.
- Product Type: Declare the product type.
- Attributes: Determine the variant you’re pricing.
- Image: Add an image to differentiate that variant quickly.
- Price: Sale price defines the product’s selling price.
- SKU: Stock keeping unit.
- Tax Class: Select tax class (if applicable).
- Stock: Related to inventory.
- Dimension: Product packaging dimension.
Alternatively, you can use the ‘Auto Variation Generator’ in the first place to create all the possible product pricing variants automatically based on the attributes you have set.
Step 4: Publish Settings
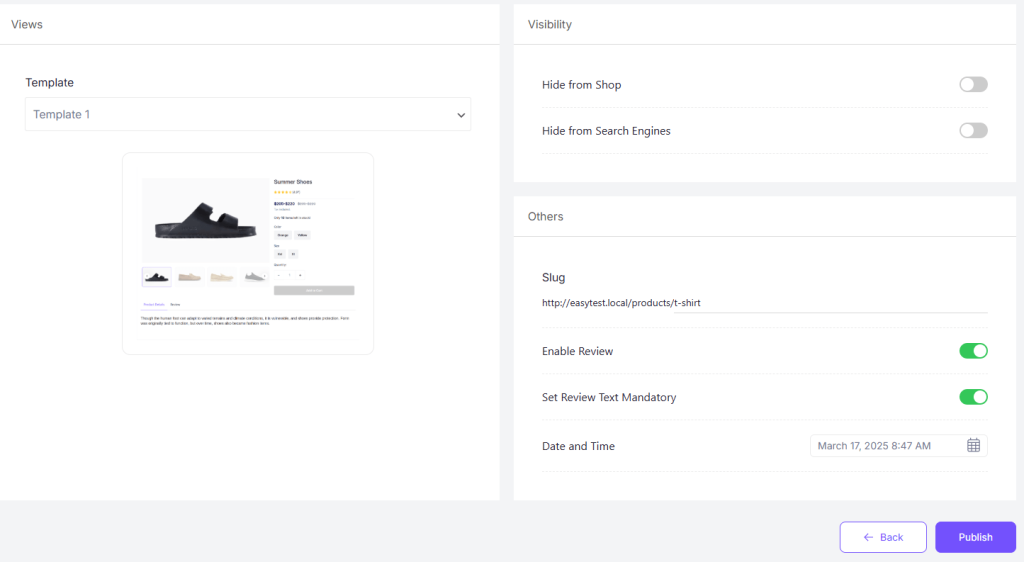
- Views: Select a product page template from the template list.
- Visibility: Hide from the shop or search engine.
- Others: Set page URL, review section, etc.
Once set, click on the ‘Publish’ button to list the product on the shop page. You can always modify your chosen layout using the builder after publishing the product.
Add Payment Functionality to Your Ecommerce Website
Payment gateways let you accept online payments securely for the products you are selling. With EasyCommerce, you get access to various payment gateway addons. These tools connect your store to your payment account, allowing transactions to go through smoothly.
Notable Payment Gateway addons offered by EasyCommerce: PayPal, Stripe, Square, Braintree, Mollie, etc. Below is the general description of how to integrate a payment gateway addon to your eCommerce website-
Step 1: Activating an Addon
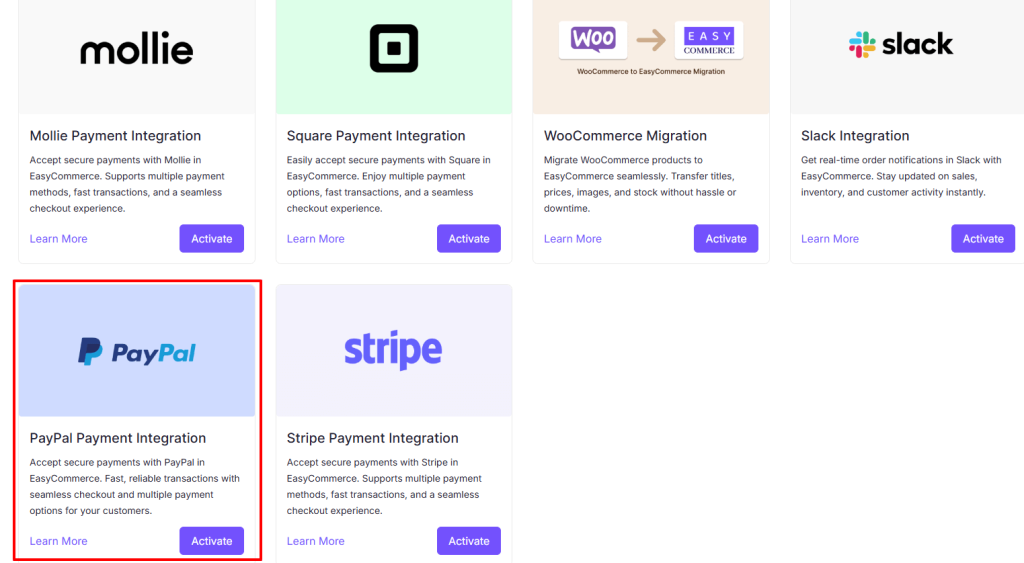
Go to EasyCommerce > Addon and click the ‘Activate’ button on the payment gateway integration addon you want to install. This will result in installing and activating the addon on your WordPress dashboard automatically.
Alternatively, you can download the addon file directly from the WordPress repository or the EasyCommerce website.
N.B.: Make sure you have already connected your site to the EasyCommerce system using the API key before trying to activate an addon.
Step 2: Configuring the Addon
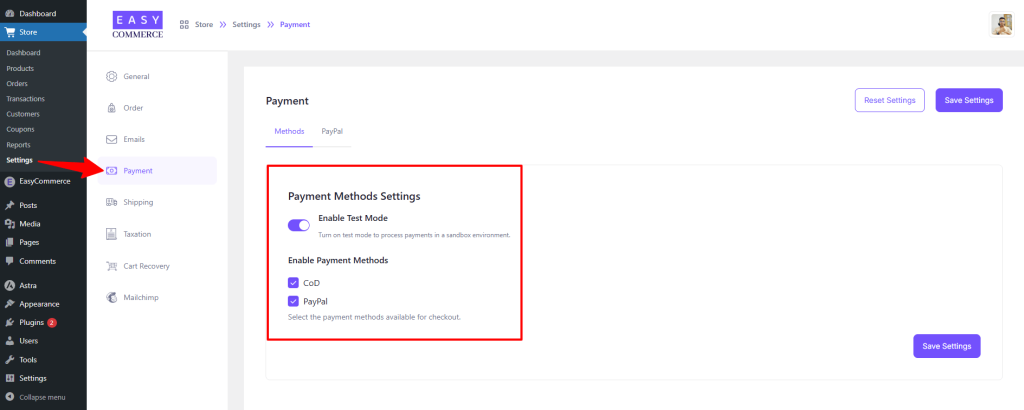
Now you need to configure the payment gateway settings to connect it with your payment service account. Let’s take PayPal as an example and go step by step with the proceedings.
- Go to Store > Settings > Payment.
- Activate the ‘Test Mode’ (optional).
- Select PayPal as your payment gateway.
- Tap ‘Save Settings’ to finalize the changes.
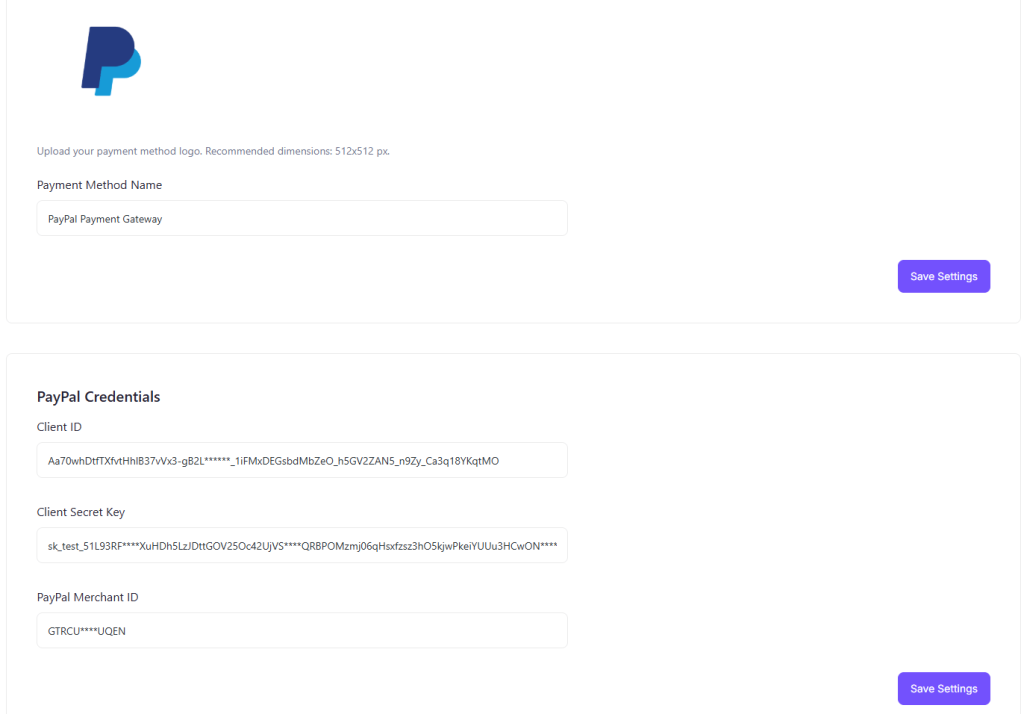
Step 3: Configure PayPal Settings
Next, access the PayPal addon settings tab, just beside the ‘Methods’ tab.
- Add a relevant payment gateway logo and give the method a name.
- Enter your PayPal credentials, i.e., Client ID, Client Secret Key, and PayPal Merchant ID, to verify your connection.
- Finally, tap ‘Save Settings’ to store the changes.
Step 4: Test the Integration
It’s all done here. Just give the integration a test ride, and you’re good to go.
- Test your account for accurate transaction activities using PayPal’s Sandbox Environment.
- Once testing is complete, switch to live mode and start accepting payments.
Create Shipping Class Using EasyCommerce
An eCommerce website without automated shipping functionality is like riding a horse without a bridle. EasyCommerce comes with a default shipping functionality that works based on the predefined shipping classes by the store owner. Follow the steps given below to set up clear shipping options based on locations-
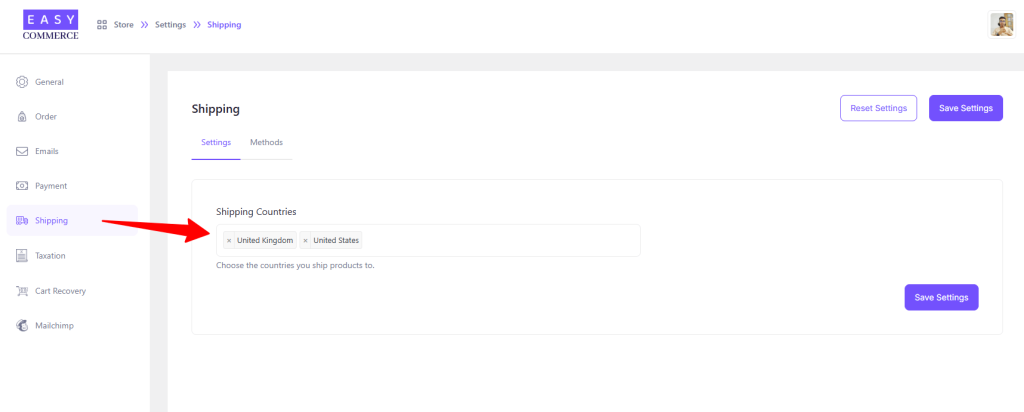
Step 1: Shipping Settings
Go to EasyCommerce Store > Settings > Shipping > Settings, and add your preferred Shipping Countries by searching and selecting.
Step 2: Add Shipping Methods
Now, navigate to the Methods tab within the same page, click the Add Shipping button, and enter the following information –
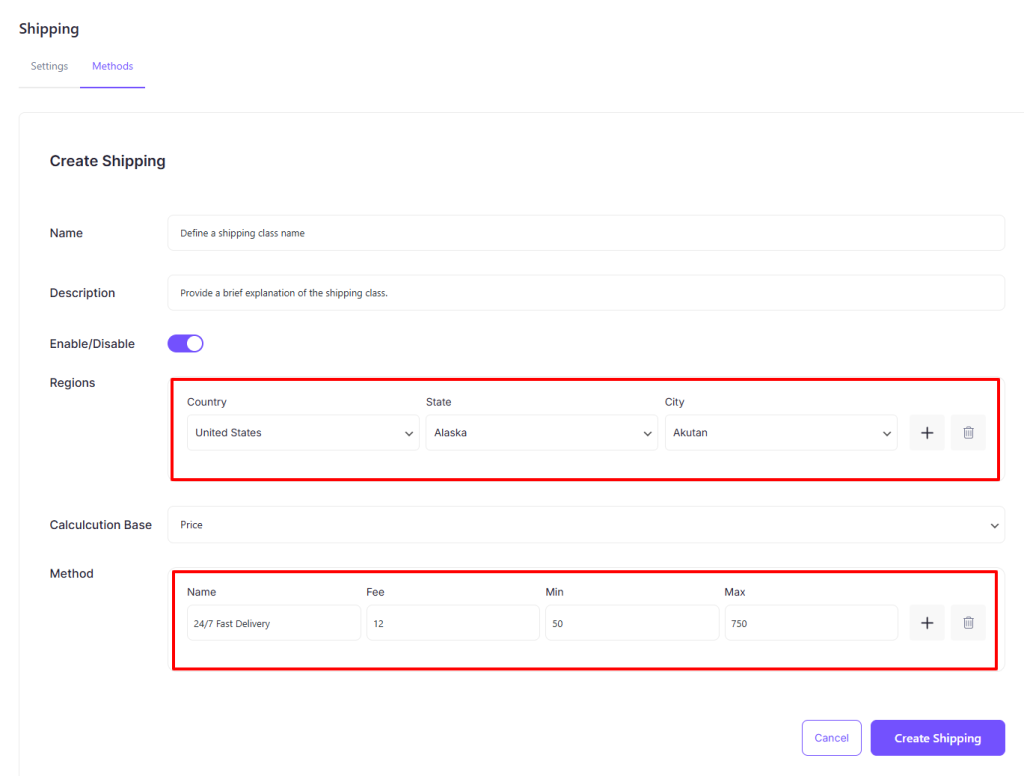
- Name: Shipping class name
- Description: Slightly longer description of the class
- Status: Set Active/Inactive status
- Regions: Geological location, i.e., Country, State, City, etc.
- Calculation Base: Shipping charge calculation base (Price, Quantity, Weight, etc.)
- Method: Name, Shipping Charge, Minimum, and Maximum expenditure limits.
Once you’re done, hit Create Shipping to enable it on your store and offer it during checkout.
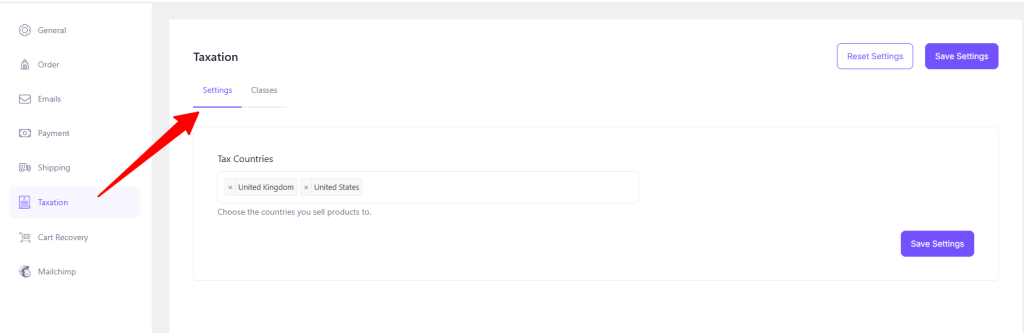
Create a Tax Class Using EasyCommerce
Taxation is a must when running an eCommerce business. Customers must pay taxes on their purchases, and it’s the store owner’s responsibility to collect those taxes on behalf of the government. Using EasyCommerce’s automated taxation system makes the process more efficient and accurate.
Step 1: Add Tax Countries
Go to EasyCommerce Store > Settings > Taxation. From here, add the countries where you want to sell your products and click Save Settings to apply the changes.
Step 3: Configure Tax Classes
From the Classes section (next to the Settings), click + Add Class and enter the following details –
- Name: Define a tax class name (e.g., ‘Standard Tax’, ‘Reduced Rate’).
- Description: Provide a brief explanation of the tax class.
Enable/Disable: Toggles to activate or deactivate the tax class.
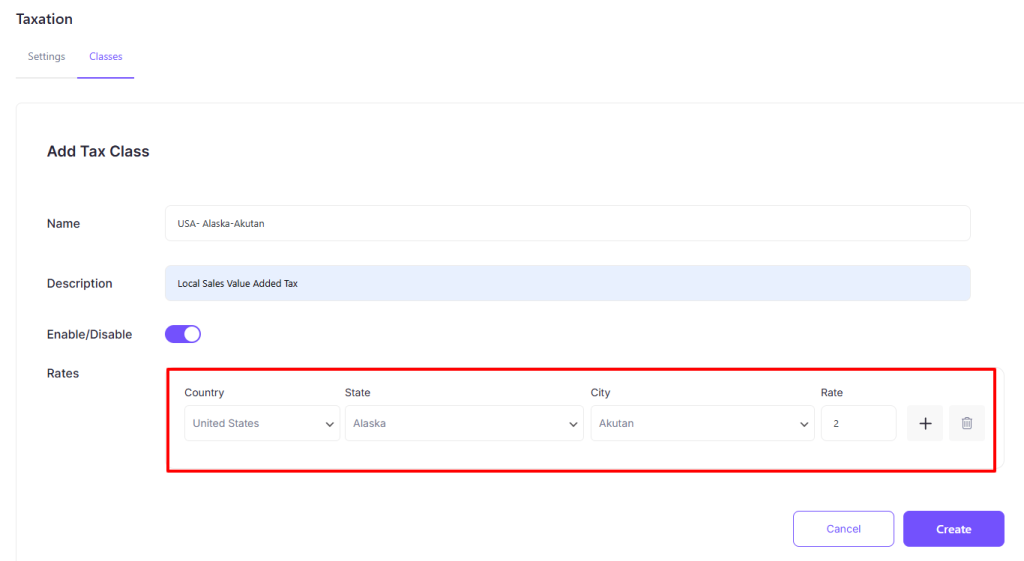
- Select the Country, State, and City where the tax rate applies.
- Enter the Rate (e.g., 10%, 5%).
- Click Create to confirm the tax settings.
Create Your Own Ecommerce Joy with EasyCommerce!
Ecommerce is transforming both the B2B and B2C industries, replacing the need for customers to visit physical markets. Creating an eCommerce website is simple, and managing it becomes effortless with the EasyCommerce plugin.
If you have followed this blog top to bottom and have implemented the know-how we have mentioned, then congratulations, your website is ready to serve customers right away.
So, whether you’re selling physical products, digital downloads, or both, create an eCommerce website in WordPress in just hours with EasyCommerce. Good luck!
